A work order is, in essence, a set of instructions attached to an aircraft (not an employee!) that detail which cabin crew should be assigned to the aircraft, where it should fly on each leg, how much fuel to buy if necessary and which payloads (passengers or cargo) to load and unload on each leg. As such you will find the work order management screen via your ‘My Aircraft’ list which can be accessed by pressing the hotkey (Alt +A), by clicking on the shortcut at the top of the OnAir Company window or by navigating to the My Company Menu → Aircraft.

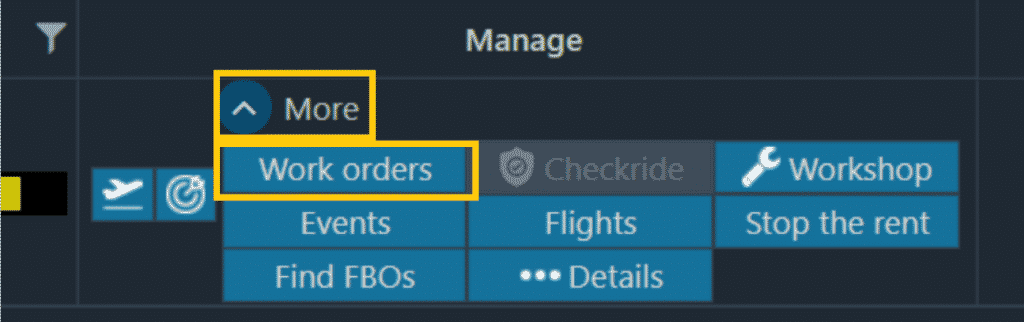
Once in your aircraft list, locate the aircraft you want to associate with a work order, expand the management options via the ‘More’ button and choose the ‘Work Orders’ button to get started.
This should bring you to the work orders management screen for that aircraft, and if this is the first time assigning a work order, or you have deleted any previous work orders it should tell you that you don’t have a work order already existing for this air‐craft. It should be noted that you can create multiple different work orders for any aircraft that will be saved and processed based on their given start time.

Go ahead and choose ‘Create a Work Order’ in the top-center or the ‘Add Work Order’ button from the top-left corner as highlighted to begin setting up your new orders, which will open up all the new options as seen on the next page.
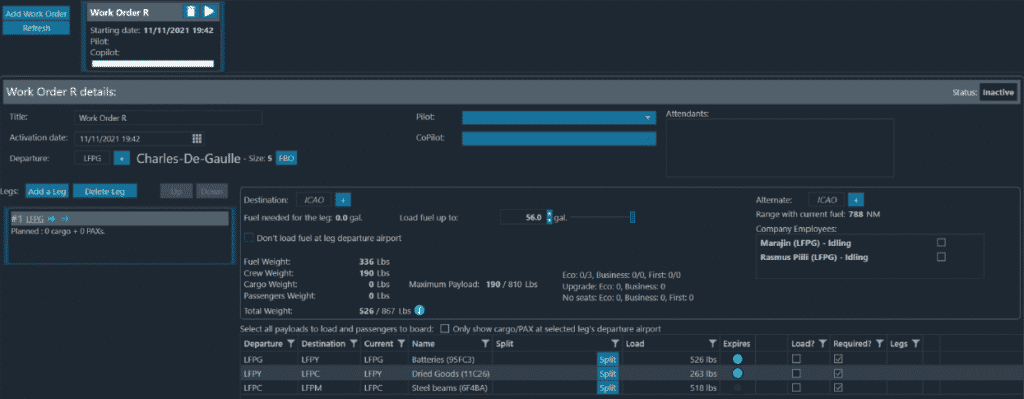
There’s an awful lot going on here so let’s break down all the options we can see and what they’re all about.
Title – This is just a name for your reference to remind you what this work order is meant to achieve.
Activation Date – This is the date and time at which the work order should become active. If you want it to start immediately, try to make sure this is in the past (remember all times and dates are calculated in UTC, not your own local time zone.)
Departure – The airport that the aircraft is expected to depart from. You will generally want to leave this as its default but may need to change it if you create multiple staged work orders for the same aircraft.
Pilot & Copilot – These dropdown boxes allow you to select which employees will occupy those roles. It will include their current status next to their name and their name will be in bold if they are available and eligible to fly the aircraft.
Attendants – If you are flying passengers then you may require a certain number of attendants onboard, this box will allow you to tick any attendants you want assigned to the work order.
Destination – Input an ICAO or use the + button to search for the airport that the aircraft should fly to next. You will need to do this for each subsequent leg until the aircraft reaches its final intended destination.
Load fuel up to – There is both a number of US Gallons that can be selected and a slider to indicate the minimum fuel level that should be automatically purchased before the aircraft departs on each leg. A suggested amount is displayed to the left of this.
Alternate – This will be automatically suggested when you enter a destination, but you may input your own choice here. The alternate airport is where the pilot will take the plane in the eventuality that bad weather or similar issues make it impossible to land at the scheduled destination.
Don’t Load Fuel at leg departure Airport – This checkbox signifies that no fuel should be purchased prior to this leg departing and this may become important, especially if flying through small airfields with no fuel facilities available.
Fuel, Crew, Cargo, Passenger and Total Weight – These give you the breakdown of weights for each leg of the work order. If a number becomes highlighted in red, then you have overloaded the plane and it will not be able to fly.
Eco/Business/First/Upgrade/No Seats – These statistics explain how your passenger load is being handled. The first line shows how many have been used out of how many are available for each class of seat. The second line demonstrates how many passengers are being offered a free class upgrade since there are no seats available in their original class. The final line is demonstrating how many passengers in each class cannot be seated on the aircraft due to there being no appropriate (or upgraded) seats available for them.
Finally we have the list of legs in the work order with some basic timing, distances and other details on the left hand side of the screen and the payload selection options on the bottom part of the screen.

Payload selection contains a number of options just inside itself, so here’s a little rundown of what’s going on:
Only show Cargo/PAX at selected leg’s departure airport – This checkbox will filter the list so that it becomes easier to only instruct the aircraft to load cargos that are already at the same airport that it will be departing from in this leg of its journey, oth‐erwise all payloads are displayed regardless of where in the world they might be right now.
Split – This button lets you break an oversided payload into segments so they can be handled in multiple journeys or by multiple aircraft. If you find yourself in a bind where you simply cannot carry enough payload and fuel, this can be a life saver.
Load? – This checkbox indicates that a particular payload should be loaded into the aircraft before the aircraft departs on the current leg, or kept loaded if it is already in the aircraft on arrival.
Required? – This checkbox is a simple rule that prevents the work order from progressing if the expected payload is no longer available for various reasons.
Legs – This column will list each leg number (see the leg list on the left side of the screen) that the payload will be carried aboard the aircraft for.
Each leg (a hop from one airport to another) can be reorganized as necessary by pressed the ‘Up’ and ‘Down’ buttons above the list.
A leg will always start from whichever airport the aircraft landed at previously.
Reorganizing the order of your legs can sometimes lead to improved efficiency by creating shorter/quicker legs, so it can be worth playing around with the order to save on rental costs, fuel costs and pilot hours.
Payloads will always be unloaded automatically if the aircraft lands at the delivery location/destination required by that job/payload.
Fuel load will automatically be set to the same as the previous leg when you add a new leg so make sure you check the fuel amount makes sense as you add legs.
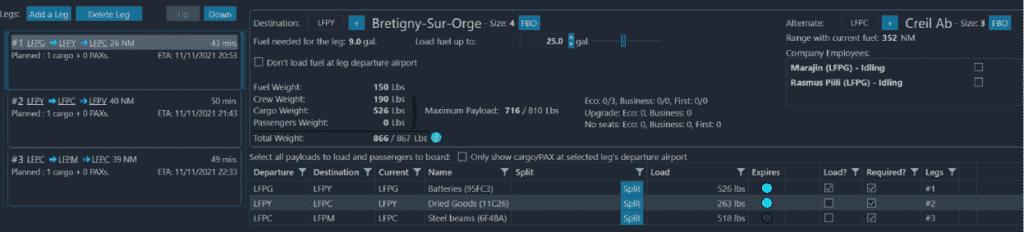
A small example (3 legs) work order is shown below to help you get a feel for how basic work orders are organized:
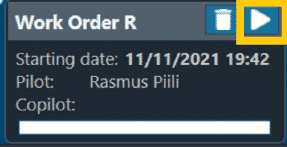
Once you are happy with your work order, you can activate it from the work order list across the top of the management screen by clicking the highlighted plus button. If you wish to delete the work order from the list, press the garbage can button instead.